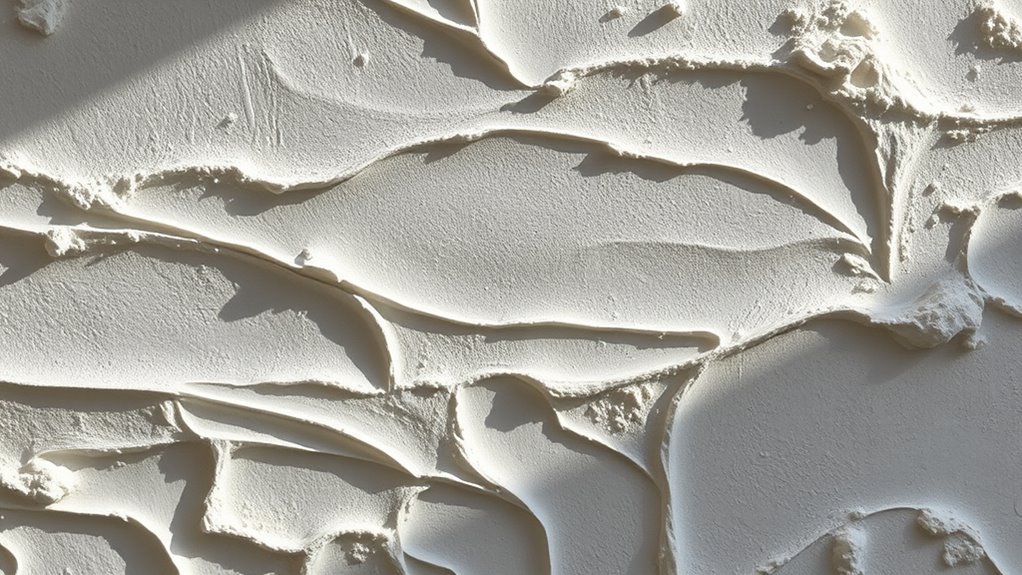
To smooth textured walls, start by thoroughly preparing the surface—fill holes, sand rough spots, and clean it well. Use the right tools like drywall knives and joint compound, applying thin, even coats to build a flawless finish. Patience is key: let each layer dry completely and sand lightly between coats. With proper steps and techniques, you can achieve a sleek surface. Keep going to discover detailed tips for perfecting your textured wall transformation.
Key Takeaways
- Proper surface preparation, including cleaning, filling gaps, and sanding, is essential for a smooth skim coat application on textured walls.
- Thin, even layers of joint compound or skim plaster should be applied with a drywall knife, feathered at edges for a flawless finish.
- Allow each coat to dry fully, then lightly sand to smooth imperfections before applying subsequent layers.
- Testing the surface with primer helps ensure good adhesion and reveals any surface issues needing correction.
- Regular maintenance and touch-ups preserve the smoothness and appearance of skim-coated walls over time.
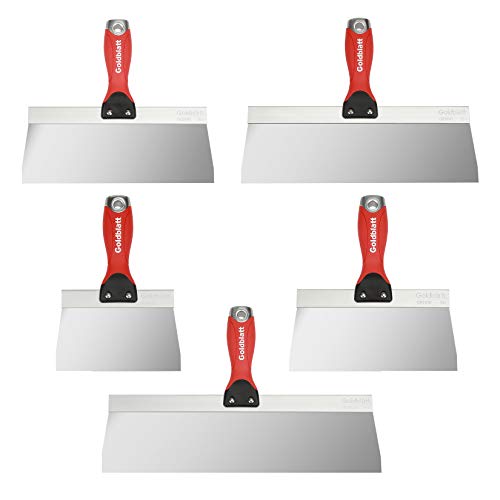
Goldblatt 5-Pieces Stainless Steel Taping Knives – 6'', 8'', 10'', 12'', 14'' Taping Knife Tools, Drywall Knife Set Perfect for Drywall Joint Taping, Finishing & Patching
TIPS: The taping knives require proper care and storage or it will corrode/rust
As an affiliate, we earn on qualifying purchases.
As an affiliate, we earn on qualifying purchases.
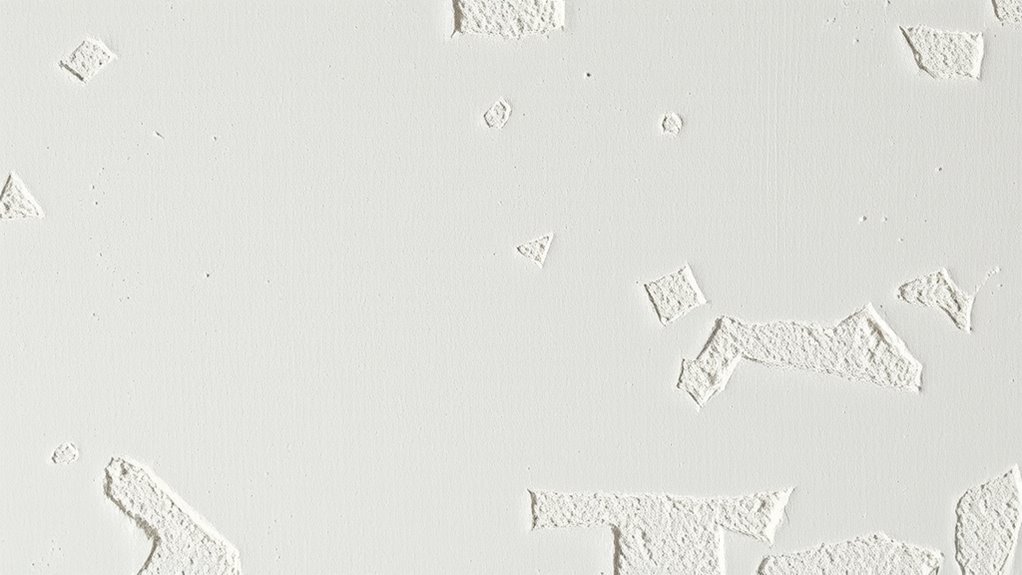
Understanding Different Types of Textured Walls

Textured walls come in a variety of styles, each offering a unique look and feel to your space. When exploring textured wall styles, you’ll notice a range of wall pattern variations, from subtle to bold. Popcorn, knockdown, slap brush, and swirl textures are among the most common options, each creating different visual effects. Popcorn texture gives a rough, bumpy surface, while knockdown smooths out peaks for a softer appearance. Slap brush provides a distinctive, irregular pattern, and swirl adds a flowing, artistic design. Understanding these different types helps you choose the right textured wall style for your aesthetic. By recognizing the wall pattern variations, you can better plan your project, whether you want a subtle background or a statement feature wall. Additionally, considering tiny house designs can inspire creative uses of textured walls in small spaces. Incorporating textured walls can also be a secure way to add character without overwhelming a room’s design. Recognizing the visual effects of each texture can help you achieve the desired atmosphere in your space. Exploring the variety of textures available allows for customization to suit both modern and traditional decor styles.

DAP Wallboard Joint Compound, White, 12 Lbs (7079810102)
Joint compound for interior surfaces provides a smooth, high quality finishing of gypsum panel joints
As an affiliate, we earn on qualifying purchases.
As an affiliate, we earn on qualifying purchases.
Tools and Materials Needed for Smoothing and Skim Coating
To smooth and skim coat your walls effectively, you’ll need the right tools for surface preparation, like taping knives and sanding blocks. You’ll also want quality materials such as joint compound and primer to attain a flawless finish. Having these essentials on hand guarantees your project goes smoothly from start to finish. Additionally, understanding the proper application of Pimple Patch technology can help you achieve a more even surface by addressing surface imperfections efficiently. Paying attention to color accuracy during the process can improve the final look by ensuring consistent color and texture across the wall surface. Using surface testing methods can help verify that your wall is properly prepared before applying the final coat, which is especially important when considering expiration of materials that might affect the quality of your finish.
Tools for Wall Preparation
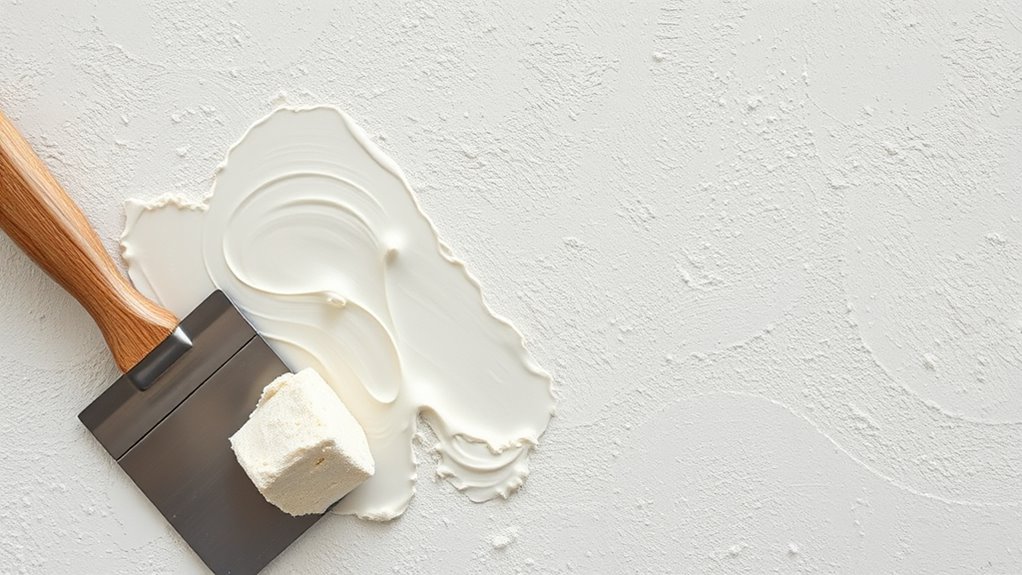
Preparing your walls for a smooth finish requires the right tools and materials. You’ll need a quality drywall knife or trowel to spread the skim coat evenly. A sanding sponge or pole sander helps smooth out imperfections after the coating dries. To guarantee a clean surface, use a putty knife for filling gaps and a brush or roller to remove dust. For preparing the wall, have a primer on hand, especially if applying decorative paint later. Wall insulation behind the surface can affect the overall finish, so check its condition beforehand. A wet sponge helps clean tools during work. Recognizing soulmate angel numbers can also guide you in choosing the right approach for your home project, ensuring harmony and success. These essentials ensure you achieve a professional, even surface, ready for finishing touches, making your textured walls look refined and smooth.
Materials for Surface Finish
Achieving a smooth, professional finish on textured walls requires the right selection of tools and materials for surface smoothing and skim coating. You’ll need high-quality joint compound or skim coat mix, which provides a seamless base for decorative finishes. Trowels, putty knives, and drywall knives are essential for applying and smoothing the material evenly. For wall texture techniques, consider finishing tools like sponge or brush for subtle effects or specialty rollers for decorative finishes. If you want a polished look, use sanding sponges or fine-grit sandpaper to refine the surface after drying. Choosing the right materials ensures a flawless base, making it easier to achieve the desired wall texture techniques or decorative finishes while maintaining a professional appearance.

Romeda 8-Pack Sanding Sponge, Four Grits Per Pack 60/80/120/220, Washable and Reusable Handmade Sandpaper Block, Drywall Sandpaper Blocks for Wooden Drywall Sheetrock and Metal Glazing
【ASSORTED GRIT SANDING BLOCKS】 8 sand blocks, 4 sizes from coarse to ultra-fine sand, 60/80/120/220 grit, 2 blocks…
As an affiliate, we earn on qualifying purchases.
As an affiliate, we earn on qualifying purchases.
Preparing Your Surface for a Smooth Finish
Before applying textured paint, you need to make sure your wall surface is clean, smooth, and free of imperfections. Start by washing the wall thoroughly to remove dust, grease, and dirt. Any holes or cracks should be filled with spackle, then sanded smooth. Applying a wall primer is essential to seal the surface and guarantee better adhesion for the paint, resulting in a more even finish. Choose a primer that suits your wall type and complements your desired paint color. Once primed, lightly sand any rough spots and wipe away dust. This preparation creates an ideal base, helping the skim coat or textured paint to adhere properly and produce a sleek, uniform surface. Proper prep minimizes flaws and improves your final finish.

20 oz Homax 4092 Aerosol Texture Water-Based Orange Peel Wall Texture
Water Based, Easy Clean Up, Low Odor
As an affiliate, we earn on qualifying purchases.
As an affiliate, we earn on qualifying purchases.
Step-by-Step Guide to Applying Skim Coat
To start applying a skim coat, gather your materials: joint compound, a putty knife or taping trowel, a mixing bucket, and a drywall knife for spreading. Mix the joint compound until smooth, ensuring no lumps remain. Before applying, consider your paint color choice, as a fresh coat can help reveal imperfections or uneven textures. If your wall has insufficient wall insulation, the uneven surface may be more noticeable after skim coating. Use the drywall knife to spread a thin, even layer of compound across the surface, working in small sections. Feather the edges to blend seamlessly with the existing wall. Allow the skim coat to dry completely before inspecting for any imperfections, which you might need to sand lightly or reapply.
Tips for Achieving a Flawless, Smooth Surface
To get a flawless, smooth surface, you need to start with proper surface preparation, making sure the wall is clean and free of dust. Applying thin coats of compound helps prevent cracking and guarantees an even finish. Focus on patience and technique to achieve the best results. Additionally, using vetted products ensures safety and effectiveness during the smoothing process. Incorporating AI-driven tools can also assist in measuring and assessing surface smoothness for professional results. Leveraging data-driven strategies can further optimize your approach and ensure consistent quality in your work.
Proper Surface Preparation
Achieving a flawless, smooth textured wall starts with proper surface preparation. First, clean the wall thoroughly to remove dust, grease, and loose debris, ensuring good adhesion. Sand any rough spots or peeling paint to create a smooth base. Fill holes or cracks with joint compound, then sand again once dry. When selecting texture patterns, consider how they’ll interact with your wall color choices—some textures can highlight imperfections or uneven surfaces. Protect surrounding areas with painter’s tape and drop cloths. Properly prepping the surface minimizes the risk of flaws showing through your skim coat or texture application. Using the right necessary cookies can also help maintain a clean workspace and ensure a better finish. Additionally, understanding best restaurants and their design elements can inspire creative wall textures that complement your space. Take your time; a well-prepared surface is the foundation for a professional-looking finish and helps achieve a smooth, flawless result.
Applying Thin Coats
Wondering how to create a smooth, flawless textured wall? The key is applying thin coats of skim plaster or joint compound. Use a high-quality, flexible trowel to spread the mixture evenly, working in small sections. Thin coats help prevent drips and uneven textures, making it easier to achieve the desired textured wall patterns or decorative wall finishes. Always let each layer dry completely before applying the next. Lightly sand between coats to smooth out imperfections and ensure a seamless surface. Remember, patience is essential—rushing can cause uneven spots or cracks. Carefully building up thin, even layers results in a smoother, more professional finish that enhances your textured wall’s appearance and durability. Additionally, understanding the importance of proper application techniques can significantly impact the final finish quality. Being aware of resources and tools available can also help you achieve better results and prevent common mistakes. Using the right tools and techniques is especially crucial when working with filtering and pump protection, as they help maintain consistent paint flow and prevent issues that could compromise your textured wall.
Finishing Touches and Maintaining Your Walls
Once you’ve finished creating your textured walls, paying attention to finishing touches and ongoing maintenance guarantees they stay beautiful over time. To enhance their appearance, consider adding decorative patterns with subtle accents or accent lighting that highlights the texture’s depth. Regular cleaning with a soft brush or vacuum helps remove dust and keeps your walls looking fresh. Inspect for any damage and repair cracks promptly to prevent further deterioration. Additionally, maintaining good wall insulation prevents moisture buildup, which can cause peeling or mold. Protect your walls from harsh impacts by using furniture pads or wall guards. Since proper maintenance reduces issues like cracking or peeling, it is essential to understand wall maintenance and address any problems early. Incorporating preventive care strategies can extend the life of your textured walls and preserve their aesthetic appeal. Understanding sound design techniques can also inspire creative ways to incorporate audio elements into your space, enhancing ambiance and overall experience. With proper care and thoughtful finishing touches, your textured walls will retain their visual appeal and durability, making your space both stylish and well-maintained for years to come.
Frequently Asked Questions
How Long Does Skim Coating Typically Take to Dry Completely?
Skim coating typically takes about 24 hours to dry completely, but this depends on factors like humidity and thickness. You should allow the drying time for the curing process to finish, ensuring the surface is fully dry before sanding or applying paint. Rushing this step can cause imperfections, so patience is key. Usually, waiting at least a day gives the skim coat enough time to cure properly and achieve a smooth finish.
Can Textured Walls Be Skim Coated Without Removing Existing Texture?
You can skim coat textured walls without removing the existing texture, but proper wall preparation is essential. To guarantee a smooth finish, lightly sand the texture and clean the surface to remove dust and debris. While you don’t need complete texture removal, applying a primer helps the skim coat adhere better. Keep in mind, for a flawless look, some homeowners opt for texture removal before skim coating, but it’s not always necessary.
What Are Common Mistakes to Avoid During Smoothing and Skim Coating?
Think of smoothing your wall like sculpting a masterpiece—precision is key. You’ll want to avoid common mistakes like rushing through preparation, which can lead to poor adhesion or uneven surfaces, and finishing errors that leave visible seams or bumps. Don’t skip sanding or skimming in thin layers; otherwise, you run the risk of creating a wavy or flaky finish. Patience and attention to detail ensure your wall turns out smooth and flawless.
How Do I Repair Cracks or Holes Before Applying a Skim Coat?
To repair cracks or holes before applying a skim coat, start with crack filling by inserting joint compound or a patching product into the cracks, then smooth it out with a putty knife. For holes, use a hole patching compound, pressing it into the opening and feathering the edges for an even surface. Allow the repairs to dry completely before sanding lightly to guarantee a smooth, flat surface for your skim coat.
Is Special Equipment Needed for Large-Scale Textured Wall Smoothing?
Do you need special equipment for large-scale textured wall smoothing? Absolutely. When tackling large projects, using specialized tools like wide taping knives, drywall sander, or even commercial-grade sprayers can make your job much easier. These tools help you achieve a smooth finish more efficiently and uniformly. Investing in the right equipment guarantees your project stays on track, saving you time and effort while delivering professional results.
Conclusion
Now that you know the basics of smoothing and skim coating textured walls, you’re ready to transform your space. With the right tools, proper preparation, and steady technique, you can achieve a flawless, smooth surface. Embrace patience, focus on detail, and enjoy the process of renewal. Whether you’re fixing imperfections or starting fresh, each step brings you closer to walls that look and feel perfect—smooth, sleek, and beautifully finished.