
To achieve clean, professional millwork lines, select a paintable, flexible caulk suited for woodworking. Make certain surfaces are clean and dry before application. Use a steady hand to apply an even bead, then smooth the sealant with a damp finger or tool. Wipe away excess immediately and reapply if needed. Allow the caulk to cure properly before painting. Mastering these steps will give you flawless, seamless lines that elevate your project’s appearance—keep going to learn more tips.
Key Takeaways
- Use a high-quality, paintable, flexible caulk suited for millwork to ensure clean, professional lines.
- Properly prepare surfaces by cleaning and drying to promote good adhesion and smooth application.
- Apply the caulk with steady pressure, filling gaps completely and maintaining a consistent bead.
- Smooth the sealant immediately with a damp finger or tool to create a seamless, refined finish.
- Allow the caulk to fully cure before painting or staining for durable, flawless millwork lines.
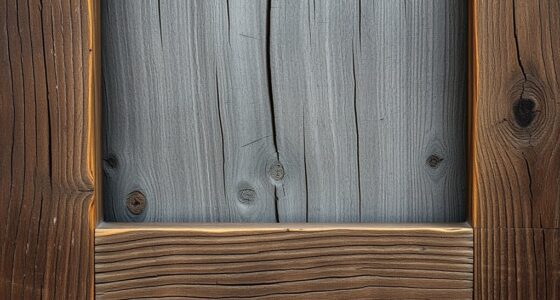
Caulking for millwork lines is an essential step in achieving a polished, professional finish in your woodworking projects. When you’re working with trim, molding, or cabinetry, clean lines make all the difference, and proper sealant application guarantees a seamless look. It’s not just about filling gaps; it’s about creating a smooth, refined surface that enhances the overall appearance of your project. To do this effectively, you need to focus on finish detailing, which involves precise application techniques to guarantee your caulk blends perfectly with the surrounding surfaces.
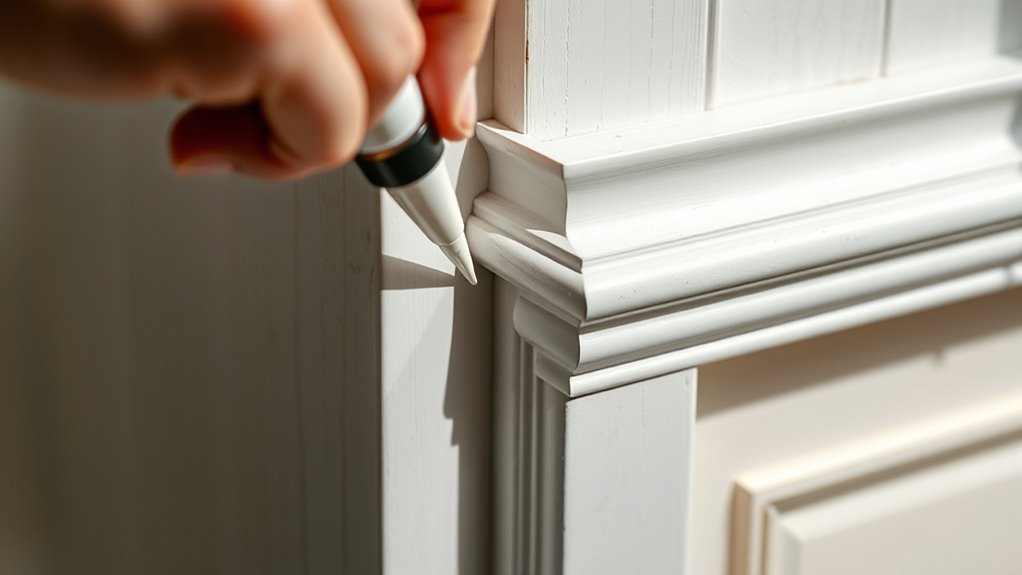
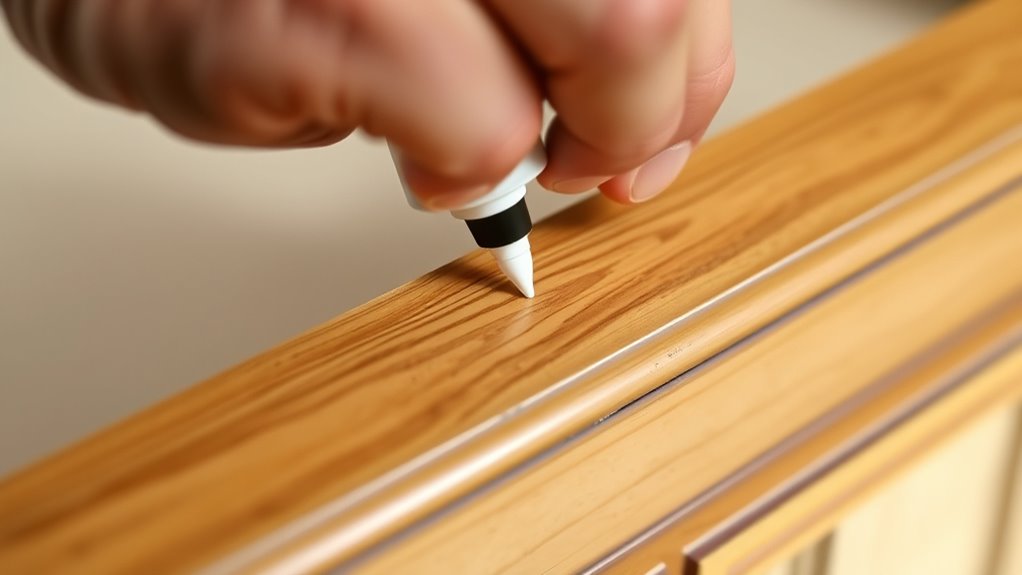
Start by selecting the right type of caulk, ideally a paintable, flexible sealant suited for millwork. Before applying, make sure the surface is clean, dry, and free of dust or grease. When you’re ready, cut the nozzle at a 45-degree angle, creating an opening that matches the width of the gap you’re filling. As you apply the sealant, use steady, consistent pressure to maintain an even bead. Keep the tip close to the surface to prevent excess, which can lead to messy edges. Your goal is to fill the gap completely without overdoing it, as excess sealant can be difficult to smooth out later.
Choose paintable, flexible caulk; cut nozzle at 45°; apply with steady pressure for clean, seamless millwork lines.
Once you’ve laid down the bead, it’s time for finish detailing. Use a damp finger or a specialized caulking tool to gently smooth the sealant into the joint. This step is essential because it ensures that the sealant adheres well and creates a clean, professional line. Pay attention to the edges—press the caulk into the gap and wipe away any excess immediately. The smoother your finish, the less sanding or touch-up work you’ll need later. If you notice any imperfections or uneven areas, carefully reapply a small amount of sealant and smooth again for a flawless look. Additionally, understanding sealant adhesion is crucial for long-lasting results, so choosing the right product and surface preparation are key.
Allow the caulk to cure as per the manufacturer’s instructions before painting or staining. Proper sealant application and finish detailing not only improve the aesthetic appeal but also help prevent moisture intrusion and future damage. Taking your time during this step pays off in the final result, giving your millwork a crisp, clean appearance that looks professionally done. With patience and attention to detail, you’ll create perfect, seamless lines that elevate the quality of your woodworking project and showcase your craftsmanship.

Selsil Siliconized Super Acrylic Latex Sealant, Indoor & Outdoor Paintable Caulk – Flexible, Weather & Moisture Resistant, White Caulking for Baseboards, Windows, Doors & More – 5.5 oz (160 ml)
ENHANCED STRENGTH & FLEXIBILITY: Our SELSIL Acrylic Latex Sealant is reinforced with silicone emulsion that enhances its strength…
As an affiliate, we earn on qualifying purchases.
As an affiliate, we earn on qualifying purchases.
Frequently Asked Questions
What Types of Caulk Are Best for Historic Millwork?
For historic millwork, you should use flexible, paintable caulking materials like acrylic latex or silicone-based caulk. These types are best for historic preservation because they adhere well, accommodate movement, and can be carefully matched to the original wood or paint colors. Avoid modern, high-performance caulks that may damage or obscure historic details. Choose quality, breathable caulking to maintain the integrity and authenticity of your historic millwork.
How Long Does Caulk Typically Last on Millwork?
Caulk typically lasts 5 to 10 years on millwork, depending on climate and exposure. To maximize caulk longevity, you should regularly inspect for cracks or gaps and reapply as needed. Keep the surface clean before resealing, and choose high-quality, paintable caulk suited for historic woodwork. Proper maintenance tips like avoiding excessive moisture and UV exposure help preserve your caulk’s appearance and functionality over time.
Can Caulking Be Applied in High-Humidity Environments?
In a humid kitchen, you can absolutely apply caulk, especially if you choose a moisture-resistant variety. For best results, use proper application techniques like cleaning surfaces thoroughly and applying in a dry, stable environment. This guarantees the caulk’s adhesion and durability. Moisture resistance is essential in high-humidity spaces, preventing mold and damage. With careful prep and suitable product selection, caulking works effectively even under humid conditions.
What Tools Are Recommended for Precise Caulking Lines?
You should choose a quality caulk gun with a smooth trigger and adjustable control for precise application. Use a sharp blade or utility knife to trim the caulk tube tip at a 45-degree angle, ensuring a clean bead. Employ precision masking techniques to protect adjacent surfaces, and steady your hand while applying the caulk to achieve clean, professional-looking millwork lines. Practice makes perfect for consistent, precise results.
How Do I Remove Old Caulk Without Damaging the Wood?
To remove old caulk without damaging the wood, start by gently scoring it with a utility knife to break the seal. Use a caulk removal tool or a plastic scraper to carefully lift the caulk, avoiding gouging the wood. Apply heat from a hairdryer if needed to soften stubborn caulk. These caulking techniques help you preserve the wood during restoration, ensuring clean, smooth lines for your project.

Saker Silicone Caulking Tools-3 in 1 Sealant Finishing Tool Grout Remove Scraper Caulk Remover Glass Glue Angle Scraper for Bathroom,Kitchen,Floor,Window,Sink Joint,Frames Seal (Black Blue)
【Tips】Here's a quick tip for achieving that smooth, one-handed gliding sensation with your grout tool: consider loosening the…
As an affiliate, we earn on qualifying purchases.
As an affiliate, we earn on qualifying purchases.
Conclusion
Think of caulking as the finishing brushstroke on a masterpiece; it brings your millwork lines to life with smoothness and precision. When you pay attention to those tight, clean lines, you’re sealing in beauty and preventing future issues. With a steady hand and the right caulk, your project transforms from good to stunning. Remember, every detail counts—like the final note in a symphony, perfect caulking makes all the difference.

Finish Line Caulk Precision Caulking Tool Pro Pack – Refillable Caulking Syringe Applicator Kit with Micro-Fine Replaceable Tips for Baseboards, Trim, Small Cracks & Detail Sealing
✅ Precision Caulking Syringe for Fine Detail Work – Ideal for baseboard caulking, wood trim, cabinetry, tile repair,…
As an affiliate, we earn on qualifying purchases.
As an affiliate, we earn on qualifying purchases.

XIYAOXI Silicone Caulking Tools Compatible with Sealant Grout Finishing Sealing 3 Pieces Blue Caulk Tool Kit Caulking Finishing Tools
Caulking Finishing Tool:provide different edges, it can meet your needs in sealing work when you seal the different…
As an affiliate, we earn on qualifying purchases.
As an affiliate, we earn on qualifying purchases.