To degloss gloss paint for a recoat, start by cleaning the surface thoroughly to remove dirt and grease. Lightly sand with fine-grit paper to dull the shine and create a good grip for the primer. Wipe away dust with a damp cloth, then apply a high-quality bonding primer suited for glossy surfaces. This will guarantee better adhesion for your new paint and result in a smooth, matte finish. Keep going to learn detailed steps for a professional-looking result.
Key Takeaways
- Clean and dry the glossy surface thoroughly to remove dirt, grease, and residues before deglossing.
- Lightly sand the glossy finish with fine-grit sandpaper to create a rough surface for primer adhesion.
- Wipe away dust after sanding to ensure a clean, smooth surface for primer application.
- Apply a high-quality bonding primer evenly to improve adhesion and promote a durable, matte finish.
- Allow the primer to fully dry and cure before painting for optimal adhesion and long-lasting results.
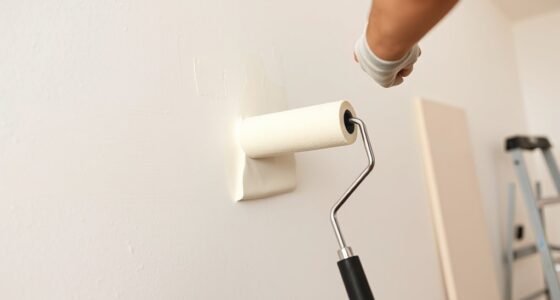
Are you struggling to achieve a smooth, matte finish on glossy surfaces without repainting entirely? If so, deglossing your paint is the smart move. Before you start, understanding the importance of proper primer application is essential. When you’re working on a glossy surface, the existing paint’s smooth, shiny finish can prevent new paint from adhering properly. That’s where deglossing comes in, creating a better surface for primer application. Proper priming ensures that the new coat bonds effectively, preventing issues like peeling or flaking down the line.
To begin, clean the surface thoroughly to remove dirt, grease, or any residues that could interfere with adhesion. Once it’s dry, lightly sand the glossy finish with fine-grit sandpaper. This step roughens the surface slightly, providing tiny nooks and crannies for the primer to grip onto. Be careful not to sand too aggressively; you want a matte, dull surface, not a scratched one. After sanding, wipe away dust with a damp cloth and let it dry completely. Now, you’re ready for primer application. Use a high-quality bonding primer designed for glossy surfaces. Apply it evenly with a brush or roller, ensuring full coverage. Allow the primer to dry as per the manufacturer’s instructions. This step is critical because a well-applied primer enhances paint adhesion, making your topcoat last longer and look better.
Once the primer is set, you’ll notice the surface has lost its shiny, slick appearance, providing a suitable base for your new paint. The primer acts as a bridge, improving the adhesion of your paint to the glossy surface. This ensures the new coat adheres smoothly without peeling or bubbling, giving you a professional-looking finish. Remember, patience is key—rushing through primer application or skipping steps can jeopardize the entire project. Wait for the primer to cure completely before applying your topcoat. When you do, you’ll find that the paint adheres effortlessly and smoothly, providing a clean, matte appearance over the previously glossy finish.

INSL-X TuffCrete Waterborne Acrylic Concrete Stain Paint, Desert Sand, 1 Gallon
Acrylic concrete, stucco, and brick paint coating designed for application to interior or exterior, vertical, or horizontal masonry...
As an affiliate, we earn on qualifying purchases.
Frequently Asked Questions
Can Deglossing Paint Be Used on All Types of Gloss Finishes?
Yes, deglossing paint can be used on most gloss finishes, but you should check paint compatibility first. It works well on many surfaces by creating a rough surface that helps new paint adhere better. However, some high-gloss or oil-based paints may require specific deglossers. Always test a small area first to verify the deglossing process effectively prepares the surface without damaging it.
How Long Should I Wait Before Recoating After Deglossing?
Did you know proper surface preparation can boost paint adhesion by up to 50%? You should wait at least 24 hours after deglossing before recoating. This drying time guarantees the deglossing agents fully evaporate, creating a better surface for the new paint. Rushing this step may lead to peeling or uneven finish, so give it enough time to dry completely for a durable, smooth coat.
Is Deglossing Paint Suitable for Outdoor Use?
Yes, deglossing paint is suitable for outdoor use if you choose a product designed for outdoor durability and weather resistance. It helps prepare surfaces exposed to the elements, guaranteeing better adhesion of new coats. You should verify the surface is clean and dry before applying, and follow the manufacturer’s instructions for best outdoor performance. This process enhances the paint’s ability to withstand weather conditions and prolongs its lifespan.
Does Deglossing Affect the Durability of the New Coat?
Deglossing your paint surface won’t considerably affect the durability of the new coat if you properly prepare the surface. It improves paint adhesion by creating a slightly roughened surface, which helps the new paint stick better. However, skipping thorough surface preparation after deglossing can reduce durability and cause peeling over time. Always clean and lightly sand the area after deglossing to guarantee ideal adhesion and long-lasting results.
Can I Use Deglossing Paint Over Existing Painted Surfaces?
Yes, you can use deglossing paint over existing painted surfaces. Just guarantee proper surface preparation by cleaning and lightly sanding the area to improve paint adhesion. Check paint compatibility to confirm the deglossing paint works well with your current finish. This process helps create a smooth, receptive surface, ensuring your new coat adheres properly and lasts longer. Always follow manufacturer instructions for best results.

INSL-X Sure Step Acrylic Anti-Slip Paint, Knight Gray, 1 Gallon (Pack of 1)
Durable, skid resistant finish anti slip paint for interior or exterior application, excellent color retention, abrasion resistance, and...
As an affiliate, we earn on qualifying purchases.
Conclusion
Deglossing dulls your dazzling paint, delivering a smooth surface for your new coat. By breaking down the gloss and banishing the barrier, you’re beautifully bridging the blank canvas of your project. Remember, proper preparation paves the path to perfection, ensuring your recoat radiates with renewed resilience. With patience and the right technique, you’ll turn tarnished to terrific, transforming your space into a stunning showcase of skill and style. Happy painting!

DWIL Tub and Tile Refinishing Kit, Quick-Dry Tile Paint for Wall & Floor, Sink Bathtub Paint for Bathroom, Kitchen, Toilets, Water Based, Semi-Gloss White, 50-55sq.ft, 33oz
【Broad Applicability】The tub paint is ideal for indoor and outdoor tiles, wood, glass,ceramics, acrylic, and marble surfaces like...
As an affiliate, we earn on qualifying purchases.
SHENGWEI Floor Paint, Indoor Epoxy Floor Coating, 2 Pounds, Gray, Household Tile Color Changing Paint
Ceramic tile color change paint epoxy resin high-quality 100% solid content formula, with excellent adhesion and yellowing resistance,...
As an affiliate, we earn on qualifying purchases.