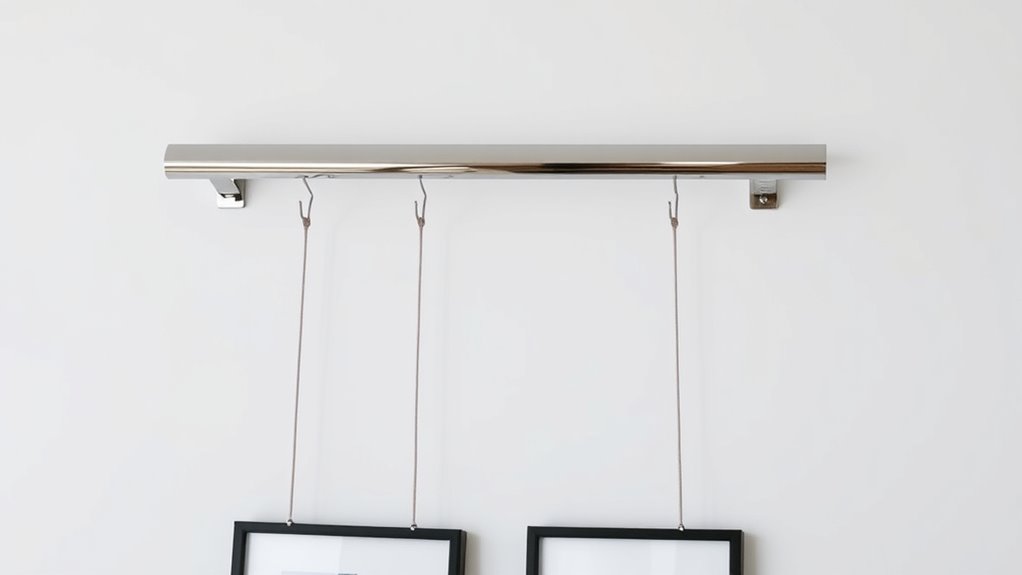

Using picture rail hanging systems with cords and hooks is simple. First, choose hooks designed for your rail and measure where you want your artwork to hang. Attach the hooks securely, ensuring they fit snugly in the rail’s groove. Adjust the cords for the perfect height and tension, keeping them taut but not overstretched. Regularly check the stability of your setup. If you keep exploring, you’ll discover tips to maintain a secure, damage-free display.
Key Takeaways
- Select hooks designed for your picture rail’s groove and ensure they are securely seated for safety.
- Measure and adjust cords to hang artwork at eye level, keeping them taut but not overstretched.
- Use adjustable cords for easy repositioning without removing hooks, maintaining a flexible display.
- Regularly check the stability of hooks and cords to prevent slipping or sagging over time.
- Understand the system’s historical purpose to handle and install artwork carefully, preserving the setup.

Picture rail hanging systems offer an efficient and damage-free way to display artwork and photos on your walls. When you decide to use cords and hooks with a picture rail, understanding the installation tips can make all the difference in ensuring your displays look professional and stay secure. Start by choosing the right hooks designed for picture rails—these typically have a hook or notch that fits seamlessly into the rail’s groove. Measure the height at which you want your artwork to hang, and mark where the hooks will go. It’s best to use a level to keep everything straight, especially if you’re hanging multiple pieces. When installing, make sure the hooks are firmly seated in the rail’s groove to prevent slipping. Adjust the cord length so your artwork hangs at eye level, and regularly check the tension to avoid sagging. Using adjustable cords makes it easier to reposition pieces without removing the hooks, saving you time and effort. Always test the stability by gently tugging on the hanging wires before finally placing your artwork, ensuring everything is secure.
Understanding the historical origins of picture rail systems can give you a deeper appreciation for their design and functionality. These systems originated in the late 19th century, primarily in European and American homes, as a way to display art without damaging walls with nails or hooks. Initially, picture rails were decorative wooden moldings placed high on walls, often near the ceiling, allowing for flexible artwork placement. Over time, the design evolved into more practical, functional systems with specialized cords and hooks that could be easily adjusted. Knowing this history, you can see how modern picture rail hanging systems have maintained the core idea of damage-free display while improving ease of use. This historical insight can inspire you to treat your system with care, recognizing its roots as a solution to a common problem—how to change art displays without leaving marks or holes. By appreciating their origins, you’ll be more mindful when installing and adjusting cords and hooks, ensuring your system remains both functional and respectful of your wall surfaces.
Incorporating these installation tips and understanding the historical origins of picture rail systems can help you create a versatile, damage-free gallery in your home. Whether you’re hanging a single piece or curating a wall of art, using cords and hooks correctly ensures your displays are secure and visually appealing. Keep your hooks properly positioned, your cords taut but not overstretched, and your adjustments frequent but gentle. With a little knowledge and care, your picture rail system will serve as a reliable and elegant way to showcase your favorite artwork for years to come.
Frequently Asked Questions
Can Picture Rail Systems Support Heavy Artwork?
Yes, picture rail systems can support heavy artwork if you choose the right system with a sufficient weight capacity. Make sure to check the installation methods, as secure mounting into wall studs or using heavy-duty anchors guarantees safety. Properly installed, these systems can hold substantial weight, allowing you to display large, heavy pieces confidently. Always verify the weight limits before hanging your artwork to prevent accidents or damage.
Are Cords Adjustable for Different Picture Sizes?
Yes, the cords are adjustable, giving you incredible picture size flexibility. You can easily change the height or position of your artwork, making it simple to create the perfect display. Imagine the ease of swapping out pieces or adjusting them to suit different spaces—all without hassle. With adjustable cords, you gain versatility, control, and a seamless way to showcase your artwork exactly as you envision it.
How Do I Prevent Wall Damage When Installing Hooks?
To prevent wall damage when installing hooks, start by choosing the right wall anchors for your wall type. Use a level to ensure proper hook placement, and pre-drill holes to avoid cracking. Avoid over-tightening screws, which can cause harm. Carefully insert wall anchors before attaching hooks, and always follow the weight limits to keep your walls intact. This approach keeps your walls safe while securely hanging your pictures.
Can Picture Rails Be Painted Over or Decorated?
Yes, you can paint over or decorate picture rails. You might choose decorative painting techniques or add wall treatments to enhance their look. Just make certain the surface is clean and lightly sanded before painting to improve adhesion. Use a suitable primer and paint designed for trim or wood. This way, you can customize your picture rail to match your decor, making it a stylish and functional feature in your space.
Are There Safety Tips for Hanging Fragile Items?
For hanging fragile items, follow these foolproof safety tips! First, secure your setup with steady, sturdy hooks, ensuring hanging safety. Use gentle, non-slip cords to prevent slipping or slipping. Always handle your fragile finds delicately, and consider adding padding for protection. Keep a clear, clutter-free zone to avoid accidents. By prioritizing hanging safety and fragile item tips, you’ll protect your treasured pieces while keeping your space safe and stylish.
Conclusion
Now that you know how to use picture rail hanging systems with cords and hooks, your walls will look polished and clutter-free. Just remember, this isn’t some Victorian secret—these systems are modern marvels that make rearranging art a snap. So go ahead, channel your inner Marie Kondo, and enjoy a space where every picture finds its perfect spot without needing a time machine. Your walls will thank you for the sleek, effortless upgrade!