Using string and nails is a simple way to accurately lay out arcs and arches for your mural. First, mark key points based on your design, then stretch the string tightly between nails at these points to create perfect curves. Adjust the string as needed to get smooth, even arcs. This method guarantees your proportions and symmetry stay precise before you start painting. Keep exploring, and you’ll discover tips to make your mural truly stand out.
Key Takeaways
- Use nails to mark key points along the desired arc or arch on the wall.
- Stretch taut string between nails to create a precise guide for the curve’s shape.
- Adjust the string to ensure smooth, consistent arcs before marking or painting.
- Verify proportional accuracy by measuring distances and confirming symmetry with the string.
- Remove nails carefully after marking or outlining to maintain the integrity of the layout.

Arc & Arch Painted Murals transform ordinary spaces into vibrant works of art, capturing the imagination through bold designs and intricate details. When planning a mural, one of your first considerations should be the color palette. Choosing the right colors sets the mood and tone for the entire piece. Bright, contrasting hues can energize a room, while softer, harmonious shades create a calming atmosphere. Think about how different colors interact and complement each other. You might select a dominant color to anchor the design and then add accent shades to highlight specific features. Establishing a cohesive palette helps guide your brushwork and guarantees the finished mural feels balanced and intentional.
Once you’ve settled on your color scheme, it’s time to think about your brush techniques. Your approach to applying paint will profoundly influence the mural’s overall impact. For bold, graphic elements, you might use flat, even strokes with a wider brush, creating clean lines that define shapes sharply. For more textured areas, dry brushing or stippling can add depth and visual interest. Layering different brush techniques allows you to develop complex textures and subtle transitions. For example, blending shades seamlessly with soft brushwork can bring a sense of realism or softness to certain sections, while quick, deliberate strokes can convey movement or energy. Experimenting with various techniques helps you achieve a dynamic, lively composition. Additionally, understanding AI security technologies can inspire innovative approaches to planning and executing complex designs with precision.
Using a layout with string and nails offers precision and confidence as you bring your vision to life. By marking key points and connecting them with taut string, you create a map that guides your brushwork and guarantees proportional accuracy. This method is especially helpful when designing arcs or arches that need to be perfectly symmetrical or aligned. As you work, your choice of brush techniques becomes clearer—you can switch from broad strokes for backgrounds to fine detailing for intricate patterns or highlights. This strategic variation enhances the visual depth and complexity of your mural.
Throughout the process, remember that your color palette and brush techniques are tools to express your creativity. Don’t be afraid to experiment—try different combinations of colors and stroke styles until you find what resonates with your vision. The layout with string and nails acts as your framework, supporting your artistic freedom. With careful planning and skilled execution, you’ll transform a blank wall into a captivating mural that reflects your unique style and vision, turning an ordinary space into something extraordinary.
Frequently Asked Questions
What Types of Paint Are Best for Outdoor Arch Murals?
For outdoor arch murals, you should choose weather-resistant paints like acrylic or latex to guarantee outdoor mural durability. These paints resist fading, cracking, and peeling caused by sun, rain, or temperature changes. Acrylic paints are especially popular because they adhere well to surfaces and offer vibrant colors. Using these options guarantees your mural remains striking and intact over time, even in challenging weather conditions.
How Long Does It Take to Complete a Large Arch Mural?
A large arch mural can take anywhere from a few days to several weeks, depending on your mural planning and the complexity of the design. You might find yourself immersed in a creative whirlwind that stretches your project timeline dramatically. The key is to stay organized, break down each phase, and expect surprises—sometimes what seems simple can turn into an epic masterpiece. Patience and preparation are your best tools!
Can This Technique Be Used on Textured or Uneven Surfaces?
Yes, you can use this technique on textured or uneven surfaces, but proper surface preparation is essential. You should smooth out rough patches and clean the surface thoroughly to improve paint adhesion. Applying a primer designed for textured surfaces helps create a better base, ensuring your mural stays vibrant and intact. Taking these steps guarantees your design adheres well, even on challenging, uneven surfaces.
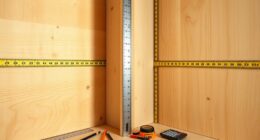
What Tools Are Essential for Creating Precise Curved Lines?
You’ll need a flexible measuring tape to accurately gauge the curve’s radius and a nail puller to remove nails without damaging your surface. Use the measuring tape to mark key points along the curve, then secure string with nails at those points. This setup helps you follow precise, smooth lines for your mural. The nail puller guarantees clean removal when you adjust or finalize your layout, keeping your workspace tidy.
How Do You Fix Mistakes or Uneven Curves in the Design?
If you notice mistakes or uneven curves, don’t worry—you can fix them easily. Use touch-up techniques like gently sanding or repainting small areas, and correct misaligned nails by carefully removing and repositioning them. Lightly adjust the string to refine curves, ensuring they stay smooth. Remember, patience is key; small corrections now prevent bigger issues later, helping your mural look polished and professional.
Conclusion
Now that you know how to create mesmerizing arc and arch painted murals using simple string and nails, you’re well on your way to designing dazzling decorative displays. With patience, precision, and a playful touch, you’ll produce impressive murals that breathe life into any space. Remember, mastering the method makes your masterpiece more meaningful. So, start sketching, stretching, and securing—soon, your stunning, structured mural will showcase your skill and style with striking success.