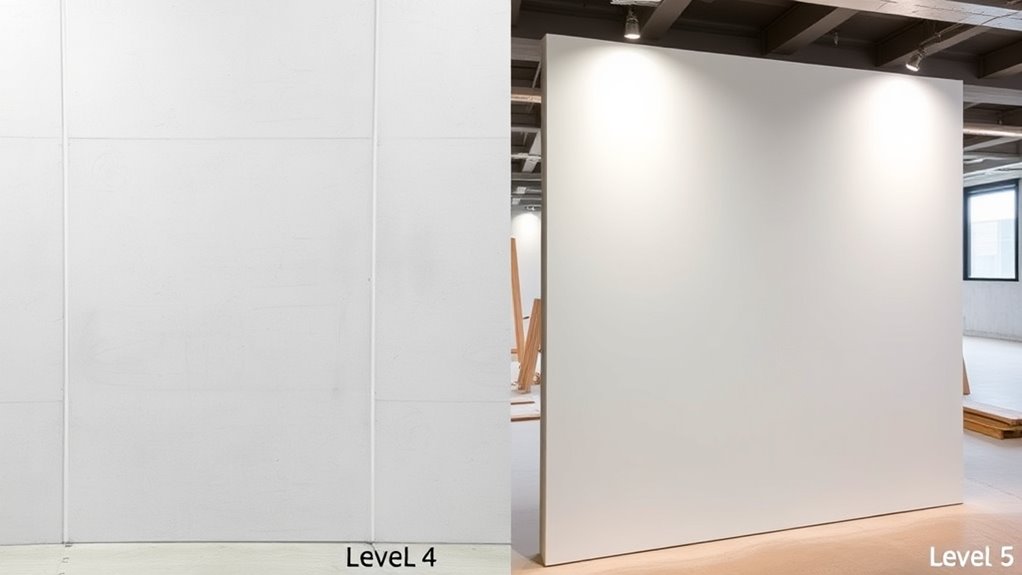

When choosing between Level 4 and Level 5 drywall finishes, consider how visible and smooth you want your surface. Level 4 offers a smooth finish suitable for most rooms, but minor flaws might show under bright lights or high-gloss paint. Level 5 provides an ultra-smooth, mirror-like surface ideal for spaces requiring perfection, like galleries or areas with intense lighting. If you want to guarantee the best outcome, exploring the details will help you decide which finish suits your needs.
Key Takeaways
- Level 4 is suitable for most standard finishes, while Level 5 offers the highest quality, ideal for highly visible or reflective surfaces.
- Level 4 involves taping, joint compound application, and sanding; Level 5 adds a skim coat over the entire surface for a flawless finish.
- Level 5 minimizes imperfections, making it suitable for spaces with bright lighting or high-gloss paints, unlike Level 4.
- Higher skill and meticulous preparation are required for Level 5 to achieve a smooth, mirror-like surface.
- Choose Level 4 for typical spaces and Level 5 for high-end or visually critical environments to ensure optimal aesthetic results.

When choosing the right drywall finish for your project, understanding the differences between Level 4 and Level 5 is essential. These levels directly impact the final appearance, especially when it comes to achieving a smooth, professional painting finish. Level 4 is suitable for most standard applications, where the painted surface won’t be highly visible or under bright lighting. It involves applying joint compound over the joints, fasteners, and any imperfections, then sanding to create a relatively smooth surface. This finish is often paired with flat paints or lightly textured finishes to help conceal minor flaws.
Level 4 drywall finish is ideal for standard applications with minor imperfections to conceal.
Level 5, on the other hand, offers the highest quality drywall finish, ideal for rooms requiring a flawless, mirror-like surface. It’s especially necessary when the lighting conditions are intense or when highly reflective paints and finishes are used. Achieving a Level 5 involves a more meticulous process. After the Level 4 finish is complete, a thin skim coat of joint compound is applied across the entire surface. This additional step helps eliminate any remaining imperfections and ensures the wall is perfectly smooth. It also requires more attention to detail during installation techniques, including careful sanding and sealing, to avoid unevenness or texture differences.
Your choice between these levels influences the painting finish you ultimately get. For Level 4, the surface will generally accept most paints well, but imperfections might become visible under certain lighting conditions or with high-gloss paints. Level 5 provides an ultra-smooth surface, reducing the risk of showing flaws, which is critical in high-end finishes or galleries. When planning your project, consider the lighting and the type of paint you’ll use, as these factors determine if a Level 4 finish suffices or if you should invest in a Level 5.
Installation techniques are key to achieving either level. For Level 4, focus on proper joint taping, applying consistent coats of joint compound, and thorough sanding to create a uniform surface. For Level 5, you’ll need to prepare your drywall more meticulously, ensuring that all seams and fasteners are perfectly smooth before applying the skim coat. Proper sealing and careful sanding are crucial to prevent any imperfections from showing through the final coat. Remember, a higher level of finish demands patience and precision, but it results in a superior painting finish that enhances the overall look of your space.
Ultimately, your decision should be based on the room’s purpose, lighting, and your desired aesthetic. Understanding the installation techniques and how they influence the painting finish ensures you select the right drywall level, saving time and effort while achieving a professional result.

DEKEones Drywall Skimming Blade Set with Portable Case, Stainless Steel 6", 10",16", 24"&32" Skimming Blades with 28"-62" Extension Handle, Drywall Finishing Tools for Plasterboard and Wallboard
[Professional Skimming Blade Set] The drywall knife set includes 10", 16" 24" and 32" four stainless steel skimming…
As an affiliate, we earn on qualifying purchases.
As an affiliate, we earn on qualifying purchases.
Frequently Asked Questions
How Long Does Drywall Level Upgrading Typically Take?
Drywall level upgrading usually takes about one to three days, depending on the level you’re aiming for. You’ll need time for drywall drying between coats and finishing techniques, especially if you’re applying multiple layers or smoothing out joints. Properly curing each layer ensures a flawless finish and prevents issues later. Keep in mind, the exact timeline varies based on room size, humidity, and your skill level, so plan accordingly.
What Are the Cost Differences Between Level 4 and Level 5?
Think of choosing drywall levels as selecting a paint finish; Level 5 is like a glossy coat, more refined and costly. The cost comparison shows Level 5 drywall usually costs 10-20% more than Level 4, due to extra materials and labor. You should consider your budget carefully, as opting for Level 5 adds to expenses but provides a smoother, premium look, ideal for high-end finishes or critical lighting conditions.
Can I Upgrade Drywall Levels After Installation Is Complete?
Yes, you can upgrade drywall levels after installation, but it usually involves drywall repair and applying advanced finishing techniques. You’ll need to remove existing finish layers carefully, then reapply joint compound, sanding, and smoothing to match the higher level. Keep in mind, this process may be time-consuming and costly, depending on the current condition of your drywall. Consulting a professional ensures the upgrade looks seamless and meets your desired finish quality.
Which Drywall Level Is Best for High-Humidity Areas?
You might think standard drywall suffices, but in high-humidity areas, opt for moisture-resistant drywall rather than risking a soggy surprise. Its surface smoothness can be preserved longer, preventing mold and damage. Irony hits hard when you realize that choosing the right drywall level isn’t just about appearance but about durability. For bathrooms or basements, moisture resistance ensures your walls stay pristine and strong, saving you time and money down the line.
Are There Specific Tools Required for Level 5 Finishing?
For Level 5 drywall finishing, you’ll need specific tools like high-quality drywall knives, sanding sponges, and a long drywall T-square. Proper drywall preparation and finishing techniques are essential to attain a flawless surface. Use a fine-tipped knife for taping and mudding, and a long sanding pole to smooth joints. These tools help guarantee your drywall surface is perfectly prepared for painting or other finishes, delivering a professional look.

LEVEL5 9" Drywall Compound Roller | 4-905
HIGH PERFORMANCE >> Effortlessly cover wall and ceiling surfaces in record time! This 9-inch wide, 3-inch thick version…
As an affiliate, we earn on qualifying purchases.
As an affiliate, we earn on qualifying purchases.
Conclusion
When choosing between Level 4 and Level 5 drywall, consider your project’s finish quality and budget. Did you know that approximately 60% of high-end homes opt for Level 5 finishes to guarantee perfection? While Level 4 offers a solid, cost-effective option for most applications, Level 5 provides a flawless surface ideal for critical lighting or paint. Make your choice based on your needs, and you’ll achieve a professional, polished look every time.

Romeda 8-Pack Sanding Sponge, Four Grits Per Pack 60/80/120/220, Washable and Reusable Handmade Sandpaper Block, Drywall Sandpaper Blocks for Wooden Drywall Sheetrock and Metal Glazing
【ASSORTED GRIT SANDING BLOCKS】 8 sand blocks, 4 sizes from coarse to ultra-fine sand, 60/80/120/220 grit, 2 blocks…
As an affiliate, we earn on qualifying purchases.
As an affiliate, we earn on qualifying purchases.

Goldblatt Banjo Tape Set Drywall Taping Tools with 10" Blue Steel Taping Knife, Lightweight & Comfortable Use for Finishing and Patching
Convenient & Efficient: You will get 1 x banjo dry tape tool and 1 x blue steel taping…
As an affiliate, we earn on qualifying purchases.
As an affiliate, we earn on qualifying purchases.