
To scribe wallpaper to uneven ceilings, start by marking high and low points with a level or straightedge. Use a contour gauge or flexible ruler to trace the ceiling’s irregular shape onto your wallpaper before cutting. Cut precisely along these lines with a craft knife for a seamless fit. Work slowly when applying, pressing the wallpaper into contours and smoothing out air bubbles. Keep practicing these steps, and you’ll discover more tips for achieving a flawless finish.
Key Takeaways
- Use contour gauges or flexible rulers to trace ceiling irregularities onto wallpaper for accurate shaping.
- Cut wallpaper along the traced lines with a craft knife, following the ceiling’s curves precisely.
- Prepare the ceiling surface thoroughly, ensuring it is clean, dry, and smooth for better wallpaper adhesion.
- Work slowly when applying wallpaper, pressing into contours with smoothing tools to follow uneven surfaces.
- Trim excess wallpaper carefully along edges to achieve a seamless finish that conceals ceiling imperfections.
Scribing wallpaper on uneven ceilings can be challenging, but with the right technique, you can achieve a seamless finish. The first step is proper ceiling prep. Before you start, ensure the ceiling is clean, dry, and free of dust or grease. Use a vacuum or damp cloth to remove debris and patch any large cracks or holes with filler. Sand the patched areas smooth so they blend seamlessly with the rest of the surface. When the ceiling isn’t perfectly flat, you need to account for its irregularities from the start. Mark the high and low points along the ceiling’s surface, using a level or straightedge if possible, to understand where the variations are most prominent. This will guide your cutting techniques and help you plan your wallpaper layout.
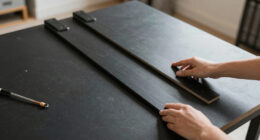
Once you’ve prepped the ceiling, focus on your cutting techniques. Measure the length of the wall and add extra for the ceiling’s irregularities. When cutting your wallpaper strips, don’t rely solely on straight lines; instead, follow the ceiling’s contours as closely as possible. Use a flexible ruler or a contour gauge to trace the ceiling’s shape onto the wallpaper, especially along the edges where the wall meets the ceiling. Cutting along these lines ensures the wallpaper will fit tightly against the uneven surface without gaps or overlaps. For sharper curves or intricate contours, use a craft knife and a steady hand to make precise cuts, rather than relying on scissors, which might be less accurate for detailed work. Additionally, understanding surface irregularities can help you better adapt your techniques for a smoother finish.
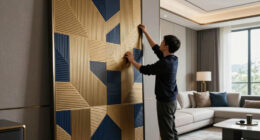
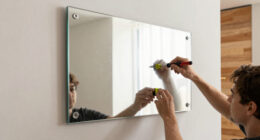
When applying the wallpaper, work slowly and carefully, pressing the material into the contours of the ceiling. Use a squeegee or smoothing tool to force the wallpaper into crevices and irregularities, working from the center of each strip outward. As you go, check your progress frequently to ensure the paper is adhering smoothly and that the pattern aligns properly. If necessary, trim excess material along the ceiling edges with a sharp blade for a clean finish. Remember, patience is key—taking your time with cutting techniques and ceiling prep minimizes errors and results in a professional-looking installation. With careful measurement, precise cutting, and attention to surface irregularities, you’ll create a beautifully scribed wallpaper that hides the ceiling’s imperfections rather than highlighting them.

DODOWIN 10 Inch Contour Gauge with Lock, Profile Duplicator Tool for Flooring, Tile, Trim & Woodworking, Shape Outline Gauge for Irregular Shapes, Father’s Day Gifts for Dad Men Husband
【Contour Gauge Profile Tool】Package included: 1 × 10'' deepen contour gauge and Freegift -5 × Extra pins. Contour…
As an affiliate, we earn on qualifying purchases.
As an affiliate, we earn on qualifying purchases.
Frequently Asked Questions
Can Wallpaper Scribing Damage the Ceiling Surface?
Yes, if you don’t do proper ceiling prep, scribing wallpaper can damage the surface. Applying wallpaper adhesives directly on uneven ceilings might cause peeling or tearing. To prevent this, make certain the ceiling is smooth and clean before scribing. Use appropriate adhesives and follow manufacturer instructions. Proper preparation minimizes the risk of damage, helping your wallpaper stay secure and looking good without harming the ceiling surface.
What Tools Are Best for Precise Scribing?
Think of your scribing tools as your compass on a journey. For precise scribing, you’ll want a sharp utility knife, a flexible contour gauge, and a straightedge. Use measuring techniques like marking the ceiling’s contours carefully, and keep the contour gauge snug against uneven surfaces. These scribing tools help you follow every bump and curve, ensuring wallpaper fits perfectly without damage, making your project smoother and more professional.
How Do I Fix Errors in Scribed Wallpaper?
If you notice errors in your scribed wallpaper, start by carefully removing the affected section using a utility knife and smoothing it out. Reapply the scribing techniques, guaranteeing your pattern matches seamlessly. Use a sharp blade to trim any uneven edges and align the wallpaper pattern properly. Take your time, work gradually, and double-check your measurements. This approach helps fix errors and ensures your wallpaper pattern stays consistent and professional-looking.
Is Wallpaper Scribing Suitable for Textured Ceilings?
Yes, wallpaper scribing works on textured ceilings, but you should consider textured ceiling challenges like uneven surfaces and loose material. Use wallpaper adhesion tips like applying primer, choosing flexible wallpaper, and carefully pressing it into textured areas. You might need to trim or tuck the wallpaper into crevices for a seamless look. Patience and proper preparation guarantee the wallpaper adheres well and enhances your textured ceiling’s appearance.
How Long Does It Take to Scribe Wallpaper on Uneven Ceilings?
On average, scribing wallpaper on uneven ceilings takes about 2 to 4 hours, depending on the ceiling’s irregularity. You’ll need to spend time on wallpaper preparation, making sure your wallpaper is cut accurately, and taking precise ceiling measurements. The more uneven your ceiling, the longer it might take, as you’ll need to carefully scribe along the contours to achieve a seamless finish. Patience ensures a professional-looking result.

Mr. Pen- 24 Inch Flexible Curve Ruler for Drawing, Sewing, Engineering
24 Inches / 60 cm Length: Double-Sided Ruler With One Side Metric Unit (1 mm Graduations) And One…
As an affiliate, we earn on qualifying purchases.
As an affiliate, we earn on qualifying purchases.
Conclusion
Think of wallpaper scribing on uneven ceilings as sculpting a masterpiece from a rough stone. It may seem intimidating at first, but with patience and the right techniques, you’ll reveal a beautifully seamless finish. Remember, every uneven bump is just part of the canvas you’re transforming. When you carefully follow these steps, you’ll turn a challenging surface into a stunning work of art—proof that patience and precision can smooth out even the roughest edges.
Fiskars Detail Craft Knife, Exacto Hobby Knife for Crafting, Arts, Modeling, Scrapbooking Supplies for Adults, Durable Aluminum Body, Included with Protective Cover, 6.21", Orange
COMFORTABLE AND CONVENIENT: SoftGrip touchpoints increase comfort and control; Compatible with most standard blades, including #10, #11, #16,…
As an affiliate, we earn on qualifying purchases.
As an affiliate, we earn on qualifying purchases.

Art3d Smoothing Tool Kit for Applying Peel and Stick Wallpaper, Vinyl Backsplash Tile
【Set of basic tools】: Package includes craft art knife with 5 replaceable blades, red smoother, blue smoother with…
As an affiliate, we earn on qualifying purchases.
As an affiliate, we earn on qualifying purchases.