Even premium removable wallpaper still needs wall prep to guarantee it adheres smoothly and stays in place. A clean, smooth surface prevents issues like bubbling, peeling, and uneven patterns that can occur over time. Proper prep removes dust, grease, and imperfections that could weaken adhesive bonds. While high-quality wallpaper is forgiving, neglecting wall prep can compromise its long-term look and durability. For helpful tips on how to prepare your walls perfectly, keep exploring this guide.
Key Takeaways
- Proper wall prep ensures optimal adhesion and prevents issues like bubbling or peeling, even with high-quality removable wallpapers.
- A smooth, clean surface enhances pattern sharpness and alignment, critical for intricate or bold designs.
- Removing dust, grease, and filling imperfections create a better bonding surface for the adhesive.
- Surface condition and material influence the effectiveness and longevity of the wallpaper’s adhesion.
- Well-prepared walls reduce the risk of air bubbles, wrinkles, and ensure a professional, lasting finish.

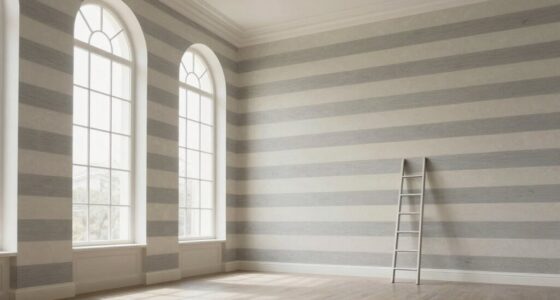
Preparing your walls properly is crucial to guarantee your removable wallpaper adheres smoothly and lasts as long as possible. Even if you’ve invested in premium removable wallpaper, skipping wall prep can lead to issues like bubbling, peeling, or uneven patterns. To get the best results, you need to understand the importance of surface quality and how different wallpaper patterns and adhesive types interact with your walls. When you choose wallpaper patterns, consider how their design may accentuate any flaws or imperfections on the wall surface. Large, bold patterns might hide minor bumps, but intricate or geometric designs require a perfectly smooth background to look sharp and clean. This is why preparing your walls thoroughly is essential, regardless of the wallpaper’s quality.
Proper wall prep ensures flawless adhesion and long-lasting, professional-looking removable wallpaper.
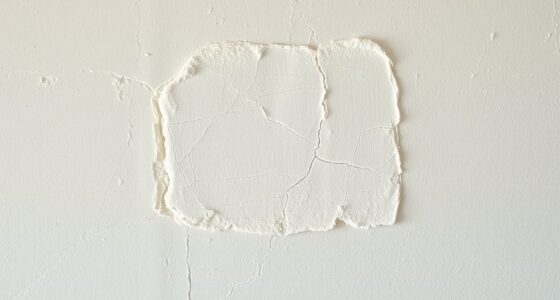
Next, consider the adhesive types involved. Premium removable wallpapers often come with specially formulated adhesives designed to be repositionable and damage-free. However, these adhesives still need a clean, smooth surface to work effectively. If the wall surface is dusty, greasy, or uneven, the adhesive may not bond properly, resulting in peeling or wrinkles over time. Proper wall prep involves removing any dirt, grease, or old paint residue, and filling in holes or cracks. Sanding the surface lightly can also create a smoother base, allowing the adhesive to grip more securely. This is especially important if you’re working with textured or uneven walls, as the adhesive needs a flat surface to perform at its best. Additionally, understanding the wall surface condition can help you choose the right prep methods and adhesives for a long-lasting application. Using the right prep methods ensures that your wallpaper’s adhesive types can do their job without interference, especially when considering indoor air quality factors that may affect surface preparation and adhesion. Proper wall prep not only enhances adhesion but also minimizes the risk of air bubbles or wrinkles, leading to a more professional finish.
Furthermore, considering the wall material can influence the prep process and the overall success of your wallpaper installation. If you’re unsure, consult the manufacturer’s instructions, which often recommend cleaning solutions or prepping steps tailored to the adhesive used. Remember, no matter how high-quality the wallpaper, the adhesive can only perform as well as the surface it’s applied to. Taking the time to prep your walls properly minimizes the risk of air bubbles, wrinkles, or premature peeling.
Ultimately, investing effort in wall prep isn’t just about adhering to instructions; it’s about ensuring your wallpaper looks flawless and remains in place for as long as you want it there. When you start with a clean, smooth, and properly prepared wall, your wallpaper patterns will align perfectly, and the adhesive types will bond securely. This results in a professional-looking finish that enhances your space and makes your decorating effort worthwhile. Remember, even premium removable wallpaper relies on a well-prepared wall to deliver the best aesthetic and durability.

COSNIGHT Clear Contact Paper Kitchen Oil Proof Waterproof Wallpaper Self Adhesive Vinyl Film High Temperature Resistant Transparent Removable Paper for Cupboard Doors Walls Kitchen 11.8In*118In
How to Use: You need to peel off a layer of plastic wallpaper in order to stick it…
As an affiliate, we earn on qualifying purchases.
As an affiliate, we earn on qualifying purchases.
Frequently Asked Questions
Can I Skip Wall Cleaning Before Applying Removable Wallpaper?
You shouldn’t skip wall cleaning before applying removable wallpaper, as surface sealing and adhesive compatibility rely on a clean surface. Dirt, grease, or dust can prevent the adhesive from sticking properly, leading to bubbles or peeling. Take a few minutes to wipe the wall with a damp cloth, ensuring it’s smooth and dry. This simple step helps your wallpaper adhere better, last longer, and look flawless.
What Tools Are Best for Wall Prep?
You might think any tool works for wall prep after wallpaper removal, but that’s not true. The best tools are a putty knife or scraper to smooth out wall texture and remove old adhesive. For stubborn spots, a stiff-bristled brush helps. A sanding block or fine-grit sandpaper smooths the surface, ensuring your removable wallpaper sticks perfectly. Proper tools make wall prep easier, preventing bubbles and ensuring a flawless finish.
How Do I Fix Small Wall Imperfections Before Wallpapering?
To fix small wall imperfections before wallpapering, start with wall sanding to smooth out rough spots and create an even surface. Use patching techniques with spackle or joint compound to fill tiny holes and cracks. Once the patches dry, sand them lightly for a seamless finish. This prep guarantees your wallpaper adheres properly and looks flawless, giving your walls a professional, polished appearance.
Is Primer Necessary for Textured Walls?
Primer necessity for textured surfaces depends on the wallpaper and wall condition. Generally, if your textured wall is porous or uneven, applying a primer helps seal the surface, ensuring the wallpaper adheres properly and lasts longer. It also prevents the texture from showing through. So, for most textured surfaces, using primer is a smart step in your prep process, providing a smooth, even base for your wallpaper.
How Long Should I Wait After Wall Prep Before Applying Wallpaper?
Think of wall prep as laying a strong foundation for a house—your wallpaper relies on it too. After completing wall prep, wait at least 24 hours before applying wallpaper. This allows the primer and wall texture to dry thoroughly, ensuring the wallpaper adhesive adheres smoothly and securely. Rushing this step risks bubbles, peeling, or uneven surfaces, so patience now guarantees a flawless finish later.

812 Wall & Baseboard Cleaner Spray – Safely Cleans Painted Walls, Baseboards, Kitchen Cabinets, Doors & More | Family & Pet Friendly | Made in America | 24oz.
CLEAN PAINTED WALLS IN SECONDS Make clean-up a breeze with the family-friendly wall cleaner for painted walls and…
As an affiliate, we earn on qualifying purchases.
As an affiliate, we earn on qualifying purchases.
Conclusion
Remember, giving your walls a little extra attention isn’t just a small step—it’s the secret to ensuring your removable wallpaper looks flawless and lasts longer. When you prep your walls properly, you’re setting the stage for beauty to shine through without a hitch. Think of it as laying a solid foundation for a masterpiece. With just a bit of care beforehand, you’ll enjoy stunning results that truly stand the test of time—and your style.

3M Small Hole Repair High Strength, All in One Applicator Tool, 1-Pack, Quick and Easy Repair for Nicks and Nail Holes, Includes Putty Knife, Spackle, and Sanding Pad For Wall Repairs (SHR-3-AIO)
MAKES REPAIRS 3X FASTER than traditional vinyl spackling
As an affiliate, we earn on qualifying purchases.
As an affiliate, we earn on qualifying purchases.

Goo Gone Spray Adhesive Remover Gel 12 Oz with Scraper, Removes Glue, Stickers, Tape Residue, Grease, Gum & Wax, Adhesive Spray with Citrus Cleaning Power for Hard Surfaces, Carpets & Fabrics
Thick Spray Gel for adhesives: Goo Gone Adhesive Remover Spray Gel, which won a 2026 Good Housekeeping Cleaning…
As an affiliate, we earn on qualifying purchases.
As an affiliate, we earn on qualifying purchases.