Mirror tiles are harder to align than they look because their glossy, reflective surfaces reveal even tiny misplacements, making precise placement essential. Slight shifts can cause visible distortions or pattern disjointedness, especially under different lighting conditions, as reflections magnify imperfections. Extra care, steady hands, and careful measurements are needed to avoid gaps, tilts, and glare issues. If you want to know how to master these tricky installations, keep going for more helpful tips.
Key Takeaways
- The glossy surface magnifies even minor misalignments, making errors more visible.
- Reflections can distort perception, complicating accurate placement during installation.
- Light and glare from reflective tiles highlight imperfections, requiring extra precision.
- Small shifts after placement disrupt pattern continuity and are difficult to correct.
- Achieving a seamless look demands meticulous measurement, steady handling, and patience.
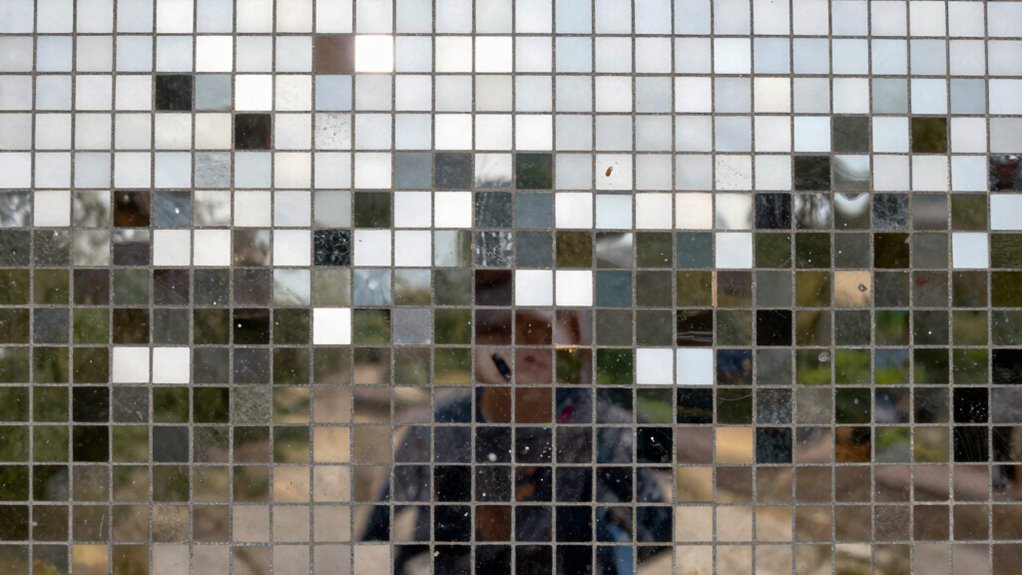
Mirror tiles may seem straightforward to install, but in reality, aligning them perfectly is more challenging than it appears. The reason lies in the nature of reflective surfaces and the importance of pattern consistency. When you’re working with mirror tiles, every tiny misalignment becomes noticeable, disrupting the visual harmony you’re trying to achieve. Unlike regular tiles, which can hide slight imperfections, mirror tiles reflect everything around them, magnifying any irregularity.
Mirror tiles highlight even small misalignments, demanding precision for a flawless, seamless reflective surface.
One of the biggest challenges you face is maintaining pattern consistency. When you lay out mirror tiles, it’s not just about fitting them into the space; you need to guarantee that the pattern aligns seamlessly across each piece. Even a small shift can throw off the entire look, making the pattern appear disjointed or uneven. This requires careful planning and precise measurements before you start sticking tiles to the wall. You’ll need to double-check that each row lines up with the next and that the edges are perfectly aligned. It’s a meticulous process, but it’s vital if you want a polished finish. Paying attention to the pattern alignment during installation can save time and frustration later on.
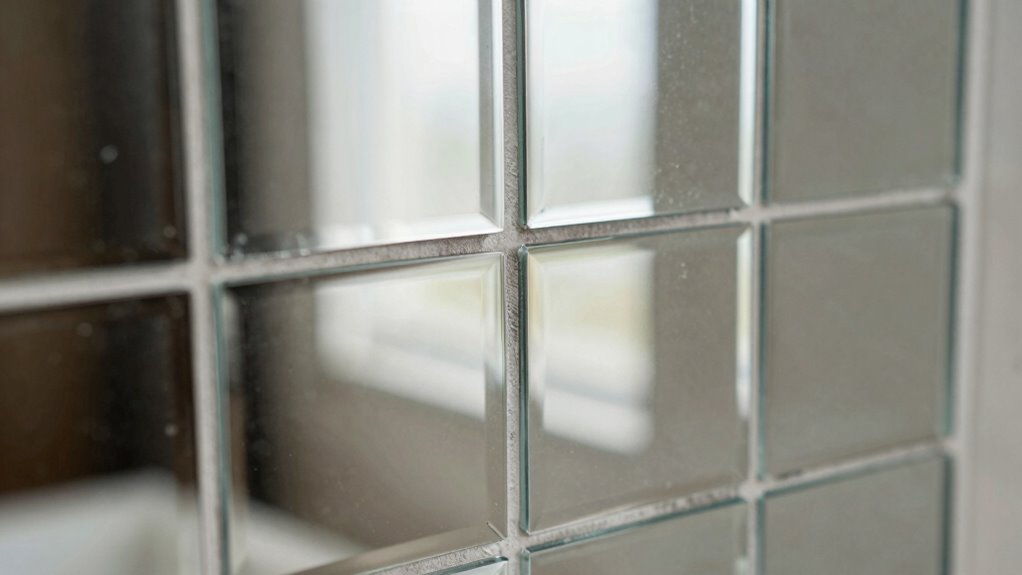
Another factor that complicates the installation is the reflective surface itself. Mirror tiles often have a glossy, smooth finish that can be unforgiving of small errors. If you don’t position them exactly right, the reflections can distort, making the misalignment even more apparent. Plus, the glossy surface can catch light differently depending on the angle, which means you need to be extra careful with your placement and lighting conditions. Even the slightest tilt or gap becomes obvious when the surface reflects the room’s surroundings. Moreover, the surface finish can influence how light interacts with the tiles, emphasizing any imperfections and making precise placement even more critical. Additionally, the reflective surface can sometimes cause glare that makes it difficult to judge alignment accurately.
Furthermore, working with mirror tiles demands patience and steady hands. You might find that a tiny adjustment here or there is necessary to achieve perfect pattern continuity. Sometimes, tiles need to be shifted slightly after initial placement, and this isn’t always easy without disturbing the surrounding tiles. Using the right adhesive and tools can help, but the precision of installation still heavily depends on your careful eye and steady movements. Additionally, the nature of reflective surfaces makes it essential to approach the installation with extra care. Being aware of these nuances helps prevent costly mistakes and ensures the best possible outcome for your project.

Blulu 20 Pack Mirror Holder Clips, Offset 0.24 Inch/ 6 mm, Glass Mirror Hanging Kit for Wall Mounting Hanging Retainer Fasteners with Screw and Anchors for Fixing Cabinet Door(Classic Style)
Complete Value Pack: each kit includes 20 durable mirror clips, 20 heavy duty screws, and 20 sturdy wall…
As an affiliate, we earn on qualifying purchases.
As an affiliate, we earn on qualifying purchases.
Frequently Asked Questions
What Tools Are Best for Aligning Mirror Tiles Accurately?
You should use a level and a straightedge to align mirror tiles accurately. Tile spacers help maintain consistent gaps, ensuring uniformity. Applying high-quality mirror adhesives provides a secure bond while allowing slight adjustments during installation. Carefully position each tile, checking alignment frequently with your level, and use spacers to keep spacing even. This combo of tools makes aligning mirror tiles more precise and easier, giving you a smooth, professional finish.
How Long Does It Typically Take to Align Mirror Tiles?
Aligning mirror tiles can take anywhere from a few hours to several days, depending on the complexity of your mirror pattern and your installation timeline. You’ll need patience to carefully adjust each tile, ensuring seamless alignment. Rushing can lead to misalignment, affecting the overall look. So, allocate enough time, stay precise, and remember that patience and attention to detail are key to achieving a flawless, professional finish.
Can Mirror Tiles Be Adjusted After Installation?
Yes, you can adjust mirror tiles after installation. If you used flexible adhesive types or gel-based options, small shifts are possible. Mirror tile styles with more flexible backing or adhesive allow easier adjustments. However, if you used permanent adhesive, adjustments become tricky and may damage tiles or the wall. Always check your adhesive type beforehand; some adhesives make realignment easier, saving you time and frustration later.
What Are Common Mistakes to Avoid During Installation?
During installation, you should avoid uneven tile spacing and rushing the process. Make sure to use the correct mirror adhesive to secure tiles firmly, preventing shifting. Measure carefully to maintain consistent spacing, as misaligned tiles are hard to fix later. Don’t skip checking levelness frequently, and avoid applying too much adhesive, which can cause tiles to slide out of place. These mistakes can make alignment much more difficult.
How Does Wall Surface Affect Mirror Tile Alignment?
In the words of a classic architect, “A wall’s character shapes its destiny.” Your wall surface impacts mirror tile alignment considerably, especially with surface texture and wall curvature. A rough or uneven surface makes precise placement difficult, causing tiles to misalign. Curved walls require special attention, as standard tiles may not sit flush. To achieve a flawless look, smooth out textured surfaces and adapt to curvature, ensuring your mirror tiles align perfectly.

JOREST Contour Gauge with Lock (10 Inch), Gift Ideas for Men Dad Carpenter Handyman, Profile Tool with Measuring Scale for Tile Flooring, Carpet laying, Woodworking, Measuring Angle/Shape/Outline/Edge
【Multi Purposes】Being used with other tools such as pallet buster, crowbar, bradawl, carpentry tools, marking tools, leveler tool,…
As an affiliate, we earn on qualifying purchases.
As an affiliate, we earn on qualifying purchases.
Conclusion
Ultimately, mastering mirror tile alignment takes patience, precision, and perseverance. Don’t be discouraged by the intimidating task; with determination and a careful eye, you’ll discover that what once seemed intimidating becomes doable. Remember, the devil’s in the details, so stay steady, scrutinize each segment, and soon you’ll see your space shine with stunning symmetry. Keep your focus firm, your fingers flexible, and your flair for finesse will transform your tile project into a true triumph!
MusselBound® Adhesive Tile Mat with Spacers – a Strong Double-Sided Adhesive that Replaces Messy Mortar. Clean, Easy, No-Stress Way to Install Real Wall Tile. Lower Total Cost Than Peel & Stick Tiles
PROVEN – MILLIONS OF SQ FT INSTALLED OVER 15 YEARS !!!
As an affiliate, we earn on qualifying purchases.
As an affiliate, we earn on qualifying purchases.

SIZIKJXGHWYI Bubble Spirit Level 60x12mm Degree Marked Surface Circular Level Round Levels Bubble Measuring Layout Tools
Material: Acrylic.
As an affiliate, we earn on qualifying purchases.
As an affiliate, we earn on qualifying purchases.